How to Install a Window Yourself: Step-by-Step Guide for Beginners
Installing a window can seem like a daunting task, especially for beginners. However, by breaking down the process into manageable steps, anyone can successfully install a window. This guide is designed for those who may have little to no experience in home improvement projects. By following these steps closely, you can install a window that enhances your home's aesthetics while improving energy efficiency. Let’s dive into the fundamentals of window installation.
Understanding Your Window Options
Before you begin the installation process, it’s crucial to understand the different types of windows available. Common types include double-hung, casement, sliding, and fixed windows. Each type has its own installation method, which will influence the steps you take. It’s essential to choose a window that suits your home’s design and your personal needs.
Gathering Your Tools and Materials
To install a window, you will need to gather several tools and materials. Here’s a list of essential items:

- Measuring tape
- Level
- Utility knife
- Caulk and caulking gun
- Screwdriver and drill
- Shims
- Safety gloves and goggles
Additionally, you will need the window you plan to install, flashing tape, and insulation material. Ensuring you have all tools and materials ready will streamline the process and reduce interruptions.

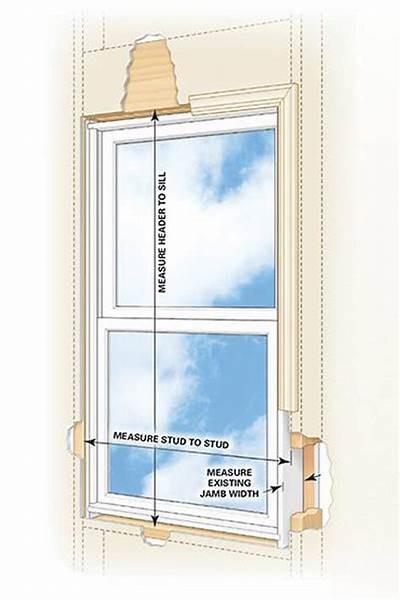
Measuring the Window Opening
Accurate measurements are critical for a successful window installation. Start by measuring the width and height of the existing window opening. Measure at three different points: the top, middle, and bottom for width, and the left, center, and right for height. Record the smallest measurements to ensure a perfect fit.
Removing the Old Window
Before you can install a new window, you must remove the old one. Start by prying off any trim or casing around the window with a utility knife. Carefully detach the window from its frame by removing screws or nails. Be cautious when handling the glass to avoid injury. Once the window is removed, clean the opening to remove any debris or nails left behind.
Preparing the Window Frame
Once the old window is gone, inspect the frame for any damage. Make repairs as needed before proceeding. It’s essential to ensure the frame is square and level; otherwise, your new window may not fit correctly. If necessary, use shims to level the frame, adjusting it until it is perfectly squared.
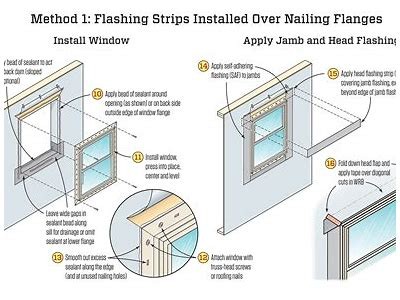
Installing the New Window
With the frame prepared, it’s time to install your new window. Carefully place the window into the opening from the outside. Ensure it sits evenly and is centered in the frame. Use a level to check that it’s straight, adjusting with shims as necessary. Once it’s in place, secure it by driving screws through the window frame into the framing of the house.
Sealing and Insulating
To prevent air and water leaks, sealing the window is vital. Apply flashing tape around the perimeter of the window, following the manufacturer’s instructions. Fill any gaps with insulation material and caulk around the edges to create a tight seal. This step is essential for ensuring your window is energy-efficient and reduces heating and cooling costs.
Finishing Touches
After sealing, it’s time to add the finishing touches. Replace any trim or casing that was removed, ensuring everything ties together seamlessly. You can also paint or stain the trim to match your décor. Lastly, clean any excess caulk or debris from the installation area. This step will provide a polished look to your new window.
Understanding Building Codes and Regulations
Before starting any window installation, it’s important to familiarize yourself with local building codes and regulations. These codes ensure that your installation is safe and adheres to community standards. Checking with your local building department will provide guidance on permits needed for the installation, and it’s always better to be informed before starting the project.
Safety Precautions
Safety should be your top priority during any DIY project. Always wear safety goggles to protect your eyes when cutting and drilling. Use gloves to prevent injuries from sharp edges. Moreover, when working on ladders or scaffolding, ensure they are stable and follow proper safety protocols.
Common Mistakes to Avoid
As a beginner, it's easy to make mistakes during installation. Some common errors include incorrect measurements, failing to level the window properly, and neglecting to seal gaps adequately. Taking your time and double-checking each step can help you avoid these pitfalls and ensure a successful window installation.
When to Call a Professional
While installing a window yourself can be rewarding, there are instances when calling a professional is advisable. If you are uncomfortable working at heights, lack the necessary tools, or are dealing with complex window types (like bay or bow windows), it's best to seek professional help. Additionally, if you encounter significant structural issues during installation, a professional can ensure that everything is up to code and safely resolved.
Conclusion
Installing a window can be an empowering project for any DIY enthusiast. By following this step-by-step guide, you can efficiently and effectively replace your window, enhancing your home’s comfort and efficiency. Remember to take your time, follow safety precautions, and reach out for help when needed. Your new window will not only elevate your home’s aesthetics but also contribute to lower energy bills and increased property value.
Final Thoughts
With the knowledge and skills gained from this guide, you can embark on your window installation project with confidence. Don’t forget to celebrate your hard work after completing your installation—enjoy the view through your new window and take pride in your accomplishment! ```